 |
|
| TheExcelAddict.com | |
| January 21, 2020 | |
| Hi fellow Excel Addict, | |
| After a longer-than-planned Christmas break I'm
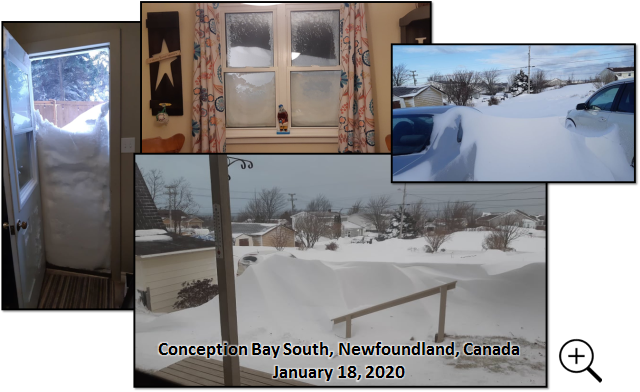
finally back. I hope that you and your family had a safe and enjoyable Christmas/holiday break. Some of you may have seen in the news that a major winter storm blasted the province of Newfoundland in eastern Canada this past weekend. And the Canadian military were brought in to help out. Yes, that's exactly where I live. From Friday night to Saturday evening we got dumped on with 75cm (2 1/2 ft) of snow and 135 kmh (84 mph) winds. For us, that was a record for the largest snowfall in a 24-hour period. So, this is what I was looking at on Saturday evening. It wasn't so much the amount of snow on the ground as much as the fact that it fell in such a short time period. And the extreme winds created massive snow drifts and power outages. Thankfully we didn't lose our power. But everything in this entire region was brought to a standstill. With all that snow, vehicles were buried and the streets were so full of snow that nothing could move. Clearing the streets of that much snow takes a long time, so for the first time I can remember, all of the towns in this area declared a State of Emergency ó meaning no one was allowed on the streets, no school, no work, etc... Luckily, I live in a town (Conception Bay South) just outside our provincial capital city (St. Johns). So with fewer streets and less dense residential areas, we were back in business by Sunday evening. But in St. John's, even today (Day 6) they are still under a SOE and still digging out. It's quite a mess and will be a long time before things get back to normal. So, now that I've finished shoveling the massive snow drifts in my driveway and on my back deck, I can get back to the business of delivering you some more time-saving Excel tips. Keep on Excelling, Francis Hayes (The Excel Addict) Email: fhayes[AT]TheExcelAddict.com |
|
|
|
|
|
|
|
| Missed my last newsletter? | |
Click Here to View it Online |
|
|
|
|
| |
|
|
|
|
If you have a favourite quote, send it to
me and I may post it in my newsletter.
|
|
THIS WEEK'S 'EXCEL IN MINUTES' TIP |
|
| Highlight
All Cells Matching Your 'Find'
Criteria |
|
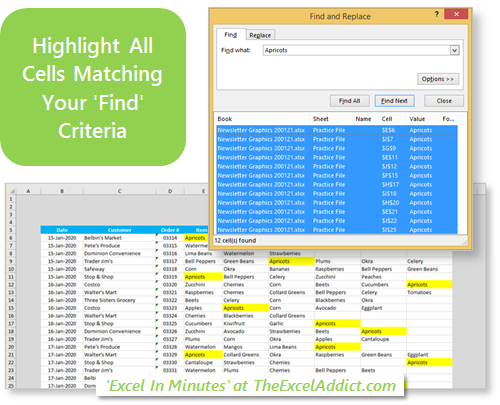
When you are searching for all instances of a particular value in your worksheet, you can use the Find All button in the 'Find and Replace' dialog (CTRL+H). All of the 'found' items will be listed at the bottom of the dialog with the first item highlighted in the list. Notice that the first 'found' item is also selected on the worksheet.  Here is a simple but extremely useful trick that most Excel users aren't aware of that lets you highlight all the cells in your worksheet that match your 'Find' criteria. 1) Press CTRL+F and type your criteria in the 'Find what' field; 2) Click the Find All button to get a list of all matching cells. If you want, you can drag the bottom-right corner of the dialog to resize it and see more items; 3) With the Find and Replace dialog still open, press CTRL+A to select all of the items listed at the bottom of the dialog. Notice that those cells have also been selected in the worksheet;  4) Close the 'Find and Replace' dialog and all of the 'found' cells will remain selected on the worksheet. At this point, if you click any cell on the sheet, all of the 'found' cells, except the active one, will be unselected; 5) However, if you want to 'highlight' all of these 'found' cells in your worksheet for further review, you can simply apply formatting such as a Fill color while the cells are still selected. Now you can work away in your worksheet and still easily see all of the 'found' cells.  This is an awesome technique that I use a lot. |
|
|
|
|
To share this tip with your friends and
|
|
|
|
|
 |
|
|
|
|
| Disclosure: Some of the resources I recommend on my website and in my newsletter pay me a small referral commission if you purchase from them through links on my website or using my referral code. This helps offset the costs of my website. I've worked long and hard to build up my reputation online over the past 10 years as someone who provides exceptional value to my readers. So I'm not willing to risk that. As you know, I donít just recommend anything. It has to be of outstanding quality and value. If you are EVER not completely satisfied with anything I recommend, please let me know and you will get your money...GUARANTEED. You can't lose. | |
|
"Spreadsheets Tips From An Excel
Addict" is a weekly publication of
TheExcelAddict.com.
Copyright Francis J. Hayes All Rights Reserved. 8 Lexington Place, Conception Bay South, Newfoundland, Canada, A1X 6A2 Phone: 709-834-4630 |


