 |
|
| TheExcelAddict.com | |
| April 20, 2020 | |
| Hi fellow Excel Addict, | |
| We had finally
gotten rid of all our snow for the first time since
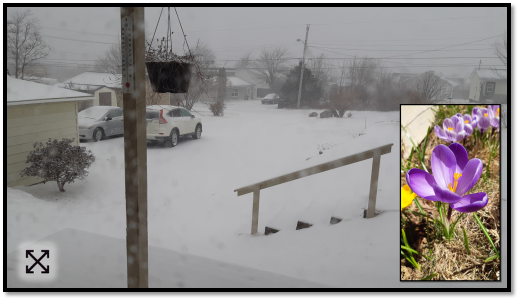
December../. ...signs of spring were popping up everywhere... ...then yesterday we got hit with a late spring snow storm (15cm /6 in). Thankfully, today that snow has all melted and it's looking like spring again. Spring has always been my one of my favorite times of the year because after a long bleak winter everything seems to be coming back to life. This spring, however, is much different than every spring that has come before but it too will lead us into summer as it always has. Please be safe and don't let the cabin fever lead you to risky behaviour. If you my tip today, please share it on social media and with your colleagues and any other Excel users you know. And while you're at it, please recommend that they sign up for my newsletter. Thanks in advance and STAY SAFE!. Francis Hayes (The Excel Addict) Email: fhayes[AT]TheExcelAddict.com |
|
|
|
|
|
|
|
| Missed my last newsletter? | |
Click Here to View it Online |
|
| |
|
Having a positive attitude can help us in difficult times. I hope today's quote will help you foster a positive attitude today. Quote of the Day "Use what talents you possess; the woods would be very silent if no birds sang there except those that sang best." -- Henry Van Dyke -- |
|
|
If you have a favourite quote, send it to me
and I may post it in my newsletter.
|
|
THIS WEEK'S 'EXCEL IN MINUTES' TIP |
|
Is Your Workbook Bloated And Slow To Open? |
|
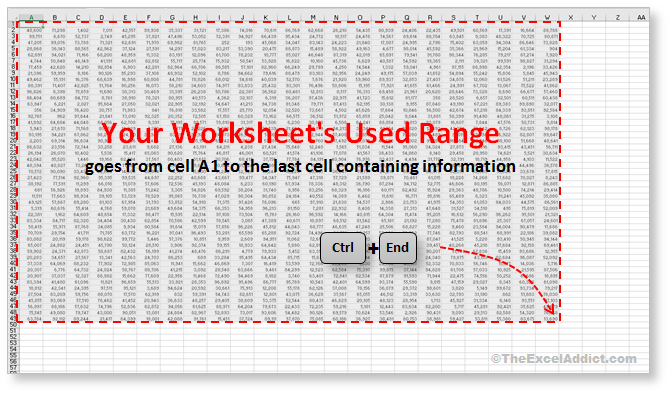
 For new Excel worksheets, the 'used range' starts out as just cell A1. But, over time, as you work with your worksheet, the 'used range' expands to include every cell you make any data or formatting changes to. Even after you delete data from those cells, the 'empty' cells remain as part of that worksheet's 'used range'. Every now and then I get an email from someone with a problem workbook that has ballooned into multi-megabyte proportions for no apparent reason. These megabyte-size workbooks are frequently slow to open, take forever to recalculate whenever a value is changed, and are often troublesome to send by email. In the vast majority of cases, these problems are the result of either:
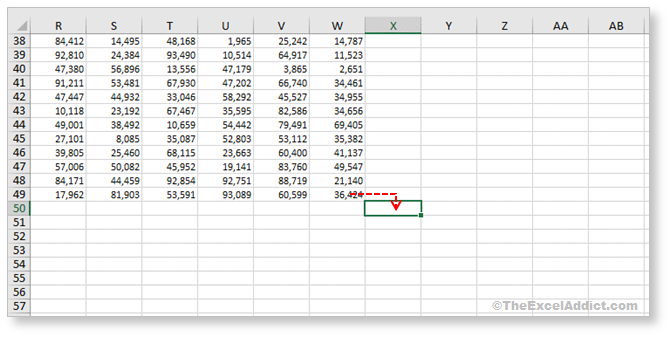
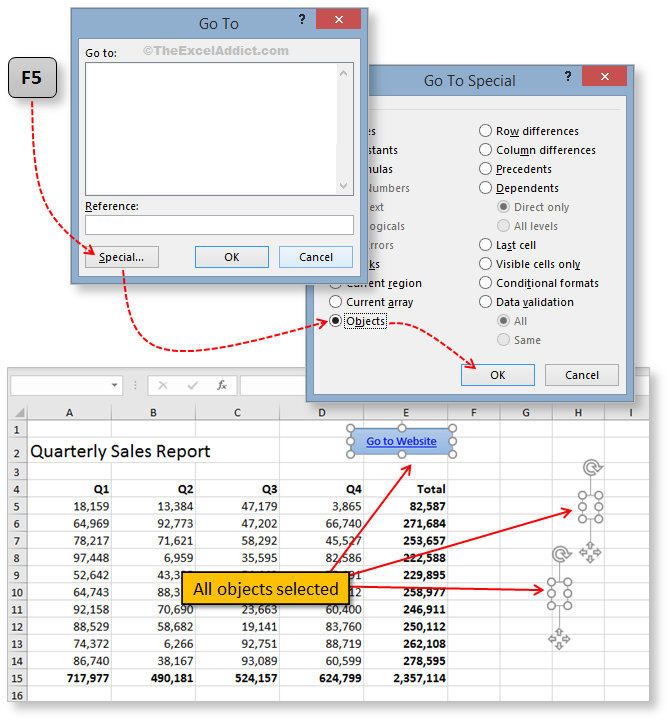
But as long as you don't use these cells, they will not be part of your worksheet's 'used range' and will not impact your workbook's size. If you do have a workbook whose file size appears to be out of proportion with the amount of data it contains, chances are you have one or both of the issues I mentioned above. Note: Even if your workbook doesn't have a huge file size or is obviously slow to open and recalculate, most workbooks that you have been using for a while could possibly benefit from resetting it's worksheet's 'used ranges'. So, "How do I fix it?", you ask. Backup your workbook Before you try my suggestions below, please be sure to make a backup copy of your workbook. Also, check and make a note of the workbook's file size. Check your worksheet's Used Range 1) To locate the bottom right corner of your worksheet's 'used range', press CTRL+End. If this brings you to a cell that is at or near the bottom right of your data, this sheet is OK and there's no need to reset the 'used range'. If the cell is far beyond the last column and or row of the data in your worksheet, continue with the next steps;  Reset your worksheet's Used Range 2) Scroll to the cell that is in the last row and last column of your data, then select the cell that is one column to the right and one row down;  3) With this cell selected, press CTRL + SHIFT + End. This will highlight the cells from the 'active cell' to the bottom-right cell of your used range (i.e. the cell you found in Step 1);  4) Right click the highlighted area and select Delete, Entire Row, OK; 5) Right-click this highlighted area again and Delete, Entire Column, OK; This will remove all data and formatting that may have inadvertently gotten added to the cells below and to the right of your data. 6) Press CTRL+S to Save changes to your workbook. This should reset the 'used range' for this sheet; 7) To verify that the 'used range' has been reset, press CTRL+End. You should be now taken to the last cell containing 'actual data' in the worksheet. If CTRL+End still takes you to a cell far below or to the right of your actual data, go to the 'Find and Delete Phantom Objects' section below; 8) If necessary, repeat the previous 7 steps for each sheet in your workbook; 9) If you want, close and check the file size of your workbook. Then reopen to see if the load time has improved. One added benefit to resetting the last used cell in your worksheets is that your scroll bars begin to work correctly again. Now scrolling half way down the scroll bar will bring you half way down your worksheet data. Find and Delete Phantom Objects If the above steps still don't fix your 'used range', another possible reason for a workbook's bloated file size is objects such as text boxes, shapes, pictures, etc... being accidentally duplicated across many cells. For example, if you copy a row that just happens to be beneath a picture (maybe in a column off screen) and paste this row down a column to hundreds of rows, that picture may also get copied and you end up with hundreds of duplicate pictures. It is very easy to quickly and dramatically increase your workbooks size by inadvertently duplicating objects hundreds or even thousands of times. Here's how you can quickly delete all objects from your worksheet - even ones you cannot see. 1) Press the F5 key on your keyboard; 2) In the Go To dialog click the Special... button; 3) Select the Objects option and click OK (all objects on the sheet will be selected);  4) Press the Delete key to delete all of the objects from the worksheet. Choose which objects to delete 1) If you don't want to delete all objects from the worksheet, go to the Page Layout tab and click on Selection Pane in the Arrange group. A Selection pane will be displayed on the right side of your worksheet listing all objects.  2) Hold down the CTRL key (sorry, the Shift doesn't work here) as you click each object name. If there's an object listed that you can't locate in your worksheet, select it on the Selection Pane and press the F2 key to bring focus to it. 3) To delete the selected object(s), press the Delete key; 4) Save these changes to your workbook; 5) Press CTRL+End to verify that the 'used range' has been reset; 6) If you want, close and check the file size of your workbook. Then reopen to see if the load time has improved. |
|
|
|
|
|
|
|
 |
|
|
|
|
| Disclosure: Some of the resources I recommend on my website and in my newsletter pay me a small referral commission if you purchase from them through links on my website or using my referral code. This helps offset the costs of my website. I've worked long and hard to build up my reputation online over the past 16 years as someone who provides exceptional value to my readers. So I'm not willing to risk that. As you know, I don’t just recommend anything. It has to be of outstanding quality and value. If you are EVER not completely satisfied with anything I recommend, please let me know and you will get your money...GUARANTEED. You can't lose. | |

