 |
|
| TheExcelAddict.com | |
| November 7, 2018 | |
| Hi fellow Excel Addict, | |
| Although
the weather here has been pretty
decent for October and November,
today we're getting a lot of rain,
wind and an unseasonable 15°C (59°F)
temperature. World-class Excel Training Before I get to today's tip, I just want to remind you that Thursday (November 8 at 8pm pST) is the last opportunity to take advantage of the 20% Discount on Mynda's Excel Dashboard and Power Bi courses. More than 1,200 of my Excel Addict readers have already taken one or more of Mynda's courses and the feedback has been fantastic. Extremely high praises for Mynda's teaching style and course content and I haven't heard a nevative comment! If ever you wanted to take a course that would catapult your Excel skills far beyond those of your colleagues, one or both of these courses is a sure bet. You can click here for more information on the courses and my bonus offer. Today my 'Excel in Minutes' tip is 'Tame That Unruly Scroll Bar'. Coincidentally, in the past week I received emails from two readers with this same issue. I always appreciate it when you share my tips with other Excel users that you know. Keep on Excelling, Francis Hayes (The Excel Addict) Email: fhayes[AT]TheExcelAddict.com |
|
|
|
|
|
|
|
|
|
|
| Missed my last newsletter? | |
Click Here to View it Online |
|
|
|
|
|
|
|
If
you
have a favourite quote, send it to me and I
may post it in my newsletter.
|
|
THIS WEEK'S 'EXCEL IN MINUTES' TIP |
|
| Tame
That Unruly Scroll Bar |
|
Do you find that at times your scroll bars get a little unruly? You drag the scroll bar button down about an inch and suddenly you find that you've scrolled down thousands of rows. Or maybe you've pressed CTRL+End to get to the end of your worksheet data and ended up down at row 325,468. This is a common issue in Excel and has been for years. In Excel, size of the scroll bar button and the distance and speed that your scroll up and down the screen is relative to the size of the 'used range' of your worksheet. 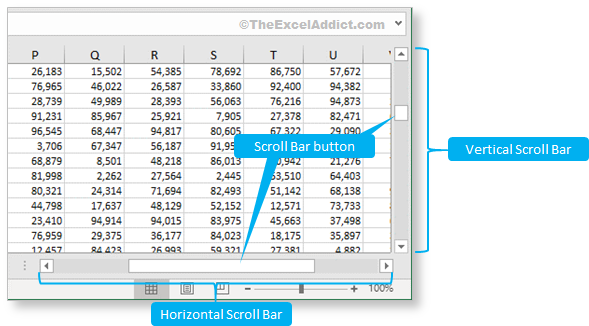 For example, if it takes you 5 Page Downs to get to the bottom of your worksheet data, the button on the scroll bar should be roughly 20% of the size of the scroll bar. Therefore, clicking in the scroll bar below the button should take you down one screen. Five clicks should take you to the bottom of your data. Alternatively, you can drag the scroll bar button to the bottom of the scroll bar and it should take you to bottom of your data. If this takes you down past the bottom of your data it is likely that these rows previously contained data that has since been deleted but Excel still considers this range part of your 'used range'. This also could be caused by data or formatting that was accidentally pasted into some far off cells. Thankfully, there is a fast and easy way to fix this. Since each sheet is independent, you will need to take the following steps for each sheet with this scrolling problem.
1) Since you will be deleting rows and
columns from your worksheets, it is
important that you have a backup copy of
your workbook saved;
2) Go to the cell that is one row below and one column to the right of the last data cell in your worksheet. Ensure there are no formulas or data above and to the right or below and to the left of this cell; 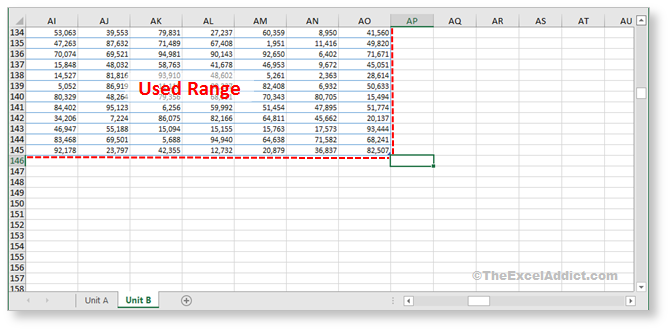 2)
Hold down both the CTRL
and SHIFT keys and press
the down arrow (more than once if necessary)
until you get to the bottom of your
worksheet (i.e. row
1,048,576).
With the CTRL and SHIFT
keys still held down, press the right arrow
(more than once if necessary) to get to the
far right edge of the worksheet (i.e. column
XFD);
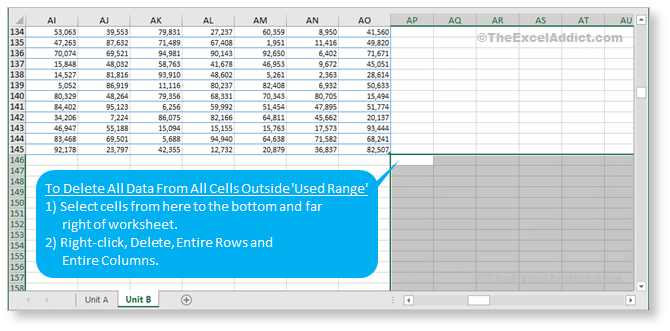 3) Right click the
highlighted area and select Delete,
Entire Row, OK;
4) Right-click again and select Delete, Entire Column, OK; This will remove any data and formatting that may have inadvertently gotten pasted into the cells below and to the right of your data cells. 5) Repeat this for each sheet in your workbook; 6) Save these changes and you should see the scroll bar adjust back to normal. If not, you may have to close and re-open your workbook for these changes to take effect. You should now be able to drag the scroll bar button to the bottom of the scroll bar and it should take you just to the bottom of your data. Wayward 'objects' can also make your scroll bar go wacky If you find that this doesn't work on a particular sheet, another possible reason for for the scroll bar issue could be objects such as text boxes, shapes, pictures, etc... being accidentally inserted or pasted in the cells outside your 'used range'. You can quickly delete all objects from your worksheet - even ones you cannot see.
1) Press the F5 key on
your keyboard;
2) In the Goto dialog click the Special... button; 3) Select the Objects option and click OK (all objects** on the sheet will be selected); 4) Press the Delete key to delete all objects from the worksheet; 5) Save these changes and you should see the scroll bar adjust back to normal. If not, you may have to close and re-open your workbook for the changes to take effect. Choosing to delete only specific objects: If you don't want to delete all objects from the sheet, you can select just the ones you want to delete.
1) On the Page Layout
tab, click on Selection Pane
in the Arrange group. A Selection and
Visibility pane will be displayed on the
right side of your worksheet listing all
objects;
2) Hold down the CTRL key (sorry, Shift doesn't work) as you click each object name; 3) Press the Delete key on your keyboard; 4)
Save these changes and you
should see that the scroll bar returns to
normal. If not, you may have to close and
re-open your workbook for the changes to
take effect.
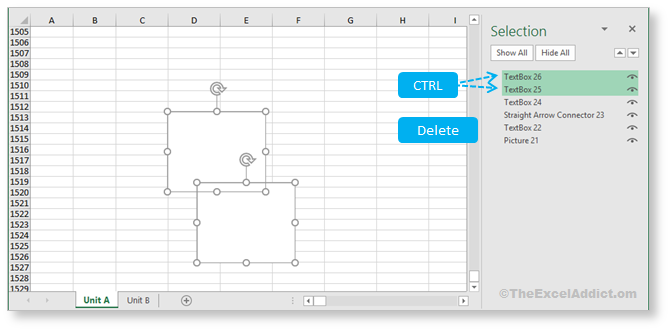 Your scroll bar should now be working correctly. |
|
|
|
|
| 'Excel in Minutes' with The Excel Addict | |
| Tame That Unruly Scroll Bar | |
| If you've found this tip helpful, please share it. | |
|
|
|
|
|
|
|
|
|

|
|
| Disclosure: Some of the resources I recommend on my website and in my newsletter pay me a small referral commission if you purchase from them through links on my website or using my referral code. This helps offset the costs of my website. I've worked long and hard to build up my reputation online over the past 10 years as someone who provides exceptional value to my readers. So I'm not willing to risk that. As you know, I don’t just recommend anything. It has to be of outstanding quality and value. If you are EVER not completely satisfied with anything I recommend, please let me know and you will get your money...GUARANTEED. You can't lose. | |
|
"Spreadsheets Tips From An Excel
Addict" is a weekly publication of
TheExcelAddict.com.
Copyright Francis J. Hayes All Rights Reserved. 8 Lexington Place, Conception Bay South, Newfoundland, Canada, A1X 6A2 Phone: 709-834-4630 |
