Make A Custom Cell Style Available For All Workbooks
by Francis Hayes (The Excel Addict)
When you create a custom Cell Style, that style is saved only in the workbook in which it was created. If you want to make a custom Cell Style available for all workbooks, you must save it in Excel's default workbook and worksheet templates. These are the templates used for all new workbooks and worksheets.
Here's how...
1) Open a new workbook (CTRL+N);
2) Delete all but one sheet tab;
3) Create a new Cell Style: From the Home tab click Cell Styles and New Cell Style... and enter a descriptive name for the style;
4) In the Style dialog, check each group of formatting characteristics (e.g. Number, Alignment, Font, Border, Fill, Protection) you want to include in the style and uncheck those you don't;
5) Click the Format... button and choose the specific characteristics (e.g. font name, font size, fill color, etc...) that you want to include in the style then click OK;
6) Depending on the version of Excel you are using, the formatting that you selected when you created the new style may have been applied to the cells that were selected on the worksheet. If that's the case for you, you will need to either delete those cells or overwrite them with formatting from a normal cell (i.e. Copy and Paste);
7) From the File menu select Save As...;
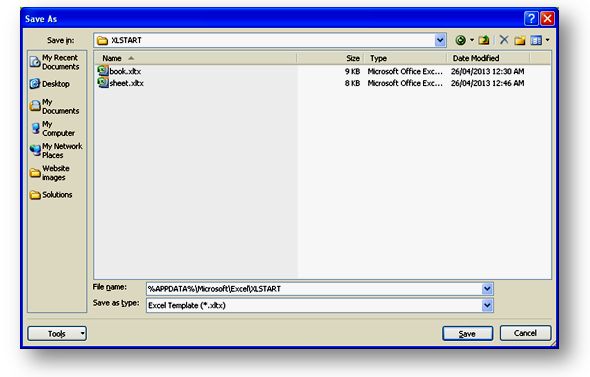
8) In the 'Save as type:' field select Excel Template (*.xltx);
9) In the 'Save in:' field, browse to your XLSTART folder. If you don't know where to find your XLSTART folder, copy and paste the following line into the 'File name:' field in Excel's Save As' dialog and press Enter. That should open your XLSTART folder in the Save As dialog;
%APPDATA%\Microsoft\Excel\XLSTART

10) Select book.xltx from the XLSTART folder or type book in the 'File name:' field. This is the default workbook template;
11) Click Save (book.xltx remains open);
12) Excel's default worksheet template is a one-sheet workbook used for inserting a new worksheet. By saving our custom Cell Style in the default worksheet template, we can then add that style to any existing workbook simply by inserting a new worksheet. To save the Cell Style (now in book.xltx) to the default worksheet template, click File, Save As. The XLSTART folder should now be visible. If you can see sheet.xltx in the XLSTART folder click on it, otherwise type sheet in the 'File name:' field and click Save;
13) Exit and restart Excel;
14) Open a new workbook and click Home, Cell Styles and you should see your custom cell style in the Custom section at the top of the Styles Gallery;
If you found this tip helpful, please share it with your friends and colleagues.
To get more tips every week like this one...
'Spreadsheet Tips From An Excel Addict'
'Excel in Seconds' & 'Excel in Minutes'
Plus you also get my 'Excel in Seconds' E-book as a BONUS!
(Download it immediately after you sign up)
Copyright Francis Hayes © All Rights Reserved
8 Lexington Place, Conception Bay South, NL Canada A1X 6A2
Phone 709-834-4630
This site is not affiliated with Microsoft Corporation.